
How to Add Closed Captioning to your YouTube Videos for Better Search Results
In this post I’ll show you exactly how I add closed captioning to my YouTube videos. But first, let’s talk about why I do this and why you should too.
What is closed captioning on YouTube?
Closed captioning (or captions) are simply written text overlaid on the video as it plays. You can see captions in action on this screenshot of one of my videos below and learn more about captions from the YouTube documentation here.
Sidenote: If you want to watch that video, you can see it on this post – How to Easily Add Internal Links to your Blog Posts
Why you should add captions to your videos
It’s about accessibility and traffic. Captions are useful to deaf or hard of hearing viewers. By including captions on your videos, you are making them available to wider audiences. More viewers = more engagement, shares, and hopefully more followers to your business.
Adding captions also allows your video and it’s content to get indexed better by search engines, increasing your organic search reach.
How to add captions to your videos automatically
There are a few options for adding captions and after doing some testing, I’ve settled on the following steps. This is the best use of my available blogging time and although this process costs me a few dollars, it’s much less time and cost if I had tried to add them myself.
- Create the video (duh)
- Get your video transcribed (I’ll show you exactly how I get this done for $1 per minute)
- Receive the transcription and move it from a Word doc to a plain text file
- Upload the video and transcription to YouTube (and let YouTube automatically add your captions)
Create your video

There are as many video tools as there are blogging platforms (or probably more), but my tool of choice is ScreenFlow for Mac. It’s simple to use for both recording your screen and on-camera style videos but also has a ton of great editing and video publishing features, including uploading directly to your YouTube account.
After I create and edit my video, I use the ScreenFlow export feature to download the video to my computer. This is necessary because of how I perform the transcription in the next step.
Learn more about ScreenFlow for Mac here.
Get your video transcribed
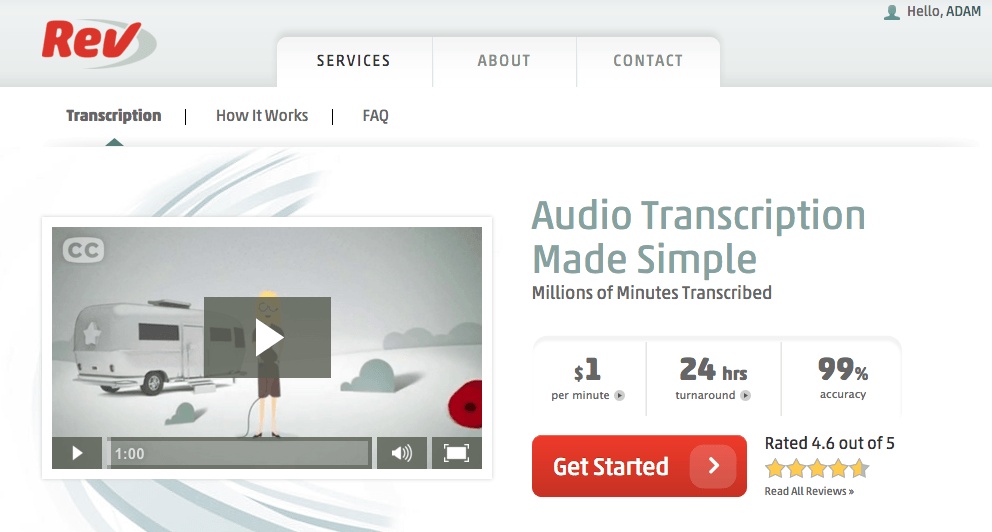
I’ve tried a ton of transcription services and the one I’ve settled on is Rev.com. Their platform is easy to use and their pricing is simple. Just $1 per minute for audio or video transcription.
I try to keep most of my videos between 3-5 minutes and this means I pay between $3-$5 per transcription. A very small price to pay for an increased viewer audience.
You can either upload the video directly, or simply add the link to your video. This second option is especially useful when you’ve already uploaded to your YouTube account from within the ScreenFlow video app.
Learn more about Rev.com here.
Move from Word to plain text file

When Rev.com is done with your transcription (they say within 24 hours, but I usually get mine within an hour), they provide you with a Word document containing the text of your spoken words.
Although you can upload your Word doc to YouTube in the next step, I’ve found it’s not always consistent. Word can add some strange characters and those might end up in your captions which you might have to manually correct later.
I’ve found it easier and quicker to simply open the Word doc, copy the text, and then paste it into a program like TextEdit (Mac) or Notepad (Windows). I save that file as “video-name.txt” and take the next step.
Upload your transcription and let YouTube create your captions
Here’s where the magic happens!
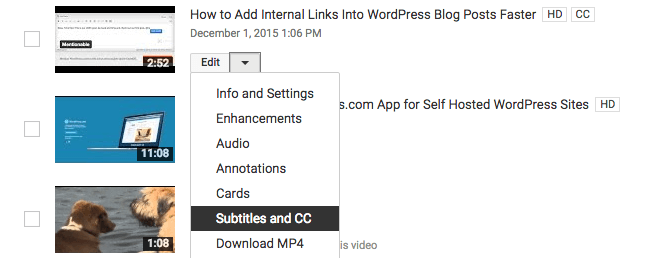
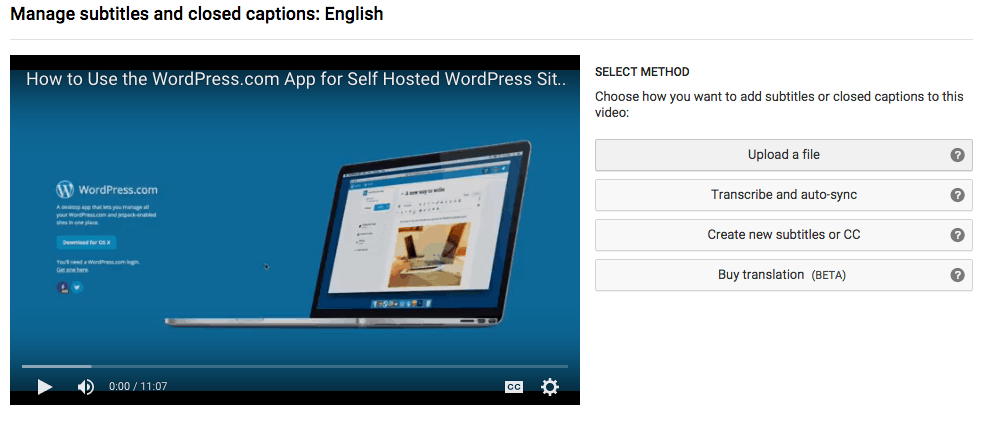
In your YouTube account, go to Creator Studio > Video Manager and click the dropdown menu next to Edit. Then choose choose > Subtitles and CC (closed captioning).
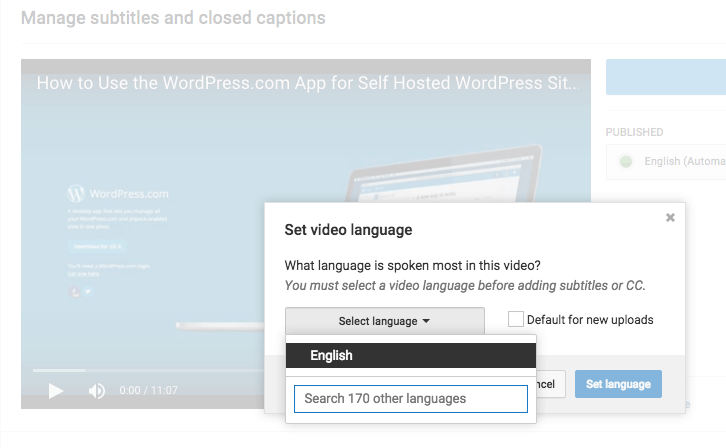
You’ll then be asked to set the language for your video captions. You can select your language and make it the Default for new uploads.
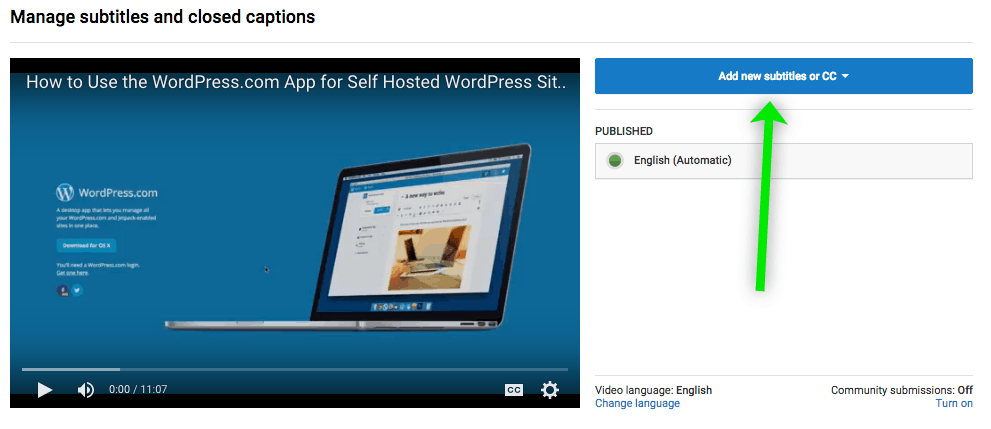
Now click the Add new subtitles or CC button.
Now select the method for adding subtitles or closed captions. Choose Upload File and choose the text file you created from your Rev.com transcript.
Choose Transcript as the file upload type.
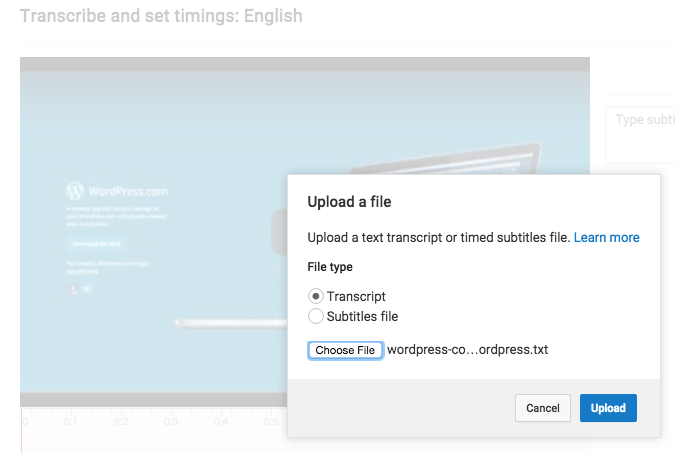
You’ll now be in the Transcribe and auto-sync settings window. There’s no need to edit anything here. Simply choose Set Timings.

After some processing time, you’ll see your transcription text available on your video after clicking the CC button.
And just like that, you’ve now gained a larger audience for your videos!
Speeding up my blogging workflow will be a recurring theme on this site and I hope you will find my tutorials useful for your own blogging experience.
Please consider subscribing below.

Don't get left behind. Join over 6,000 other WordPress-powered blog and business owners.
Receive actionable plugin and marketing tutorials for your WordPress-powered business. All quality. No bullshit.
GREAT info. Curious if you can recommend an alternative for Screenflow for Mac for those who have stayed w/ the PC.
Hi Laurie,
Thanks for commenting. The most popular option for PC would definitely be Camtasia. I have friends who use it on PC (and it turns out they also have a Mac version which I just learned about right now).
https://www.techsmith.com/camtasia.html
Thanks for the info.
gotta love the WP community!!
Great info!
I’ve just started a YouTube channel so these were very useful to me as a newbie thank you I’ve also shared on my Facebook group page